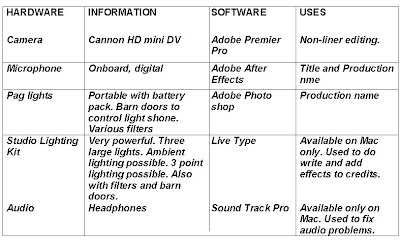
A combination of high quality, high-technology hardware and software were used to complete our products. Below is some more information, uses and things I have learnt about each piece of technology I used.

Despite having an HD (high definition) camera, we chose not to shoot in HD because the tapes needed in order to do this are very expensive. Also, as HD is a very large medium, it tends to slow down the computers making simple and usually quick processes, such as rendering, take a lot longer. However, I am hoping that for our next practical project, we will be able to shoot in HD as it is something that I would like to try.
Post production was a big part of our project and a lot of time was spent editing. I think that I achieved most and, no doubt, learnt most whilst in the edit suite. Adobe Premier Pro gave us the opportunity to be able to carry out non-linear editing. This made re-ordering clips very easy as we could just drag and drop footage in which ever order we preferred. This was most useful when we deviated from the original storyboard and decided to change the order of footage; (i.e. moving around footage of the ‘Emma getting ready’ scene.) The ability to edit on different tracks was also helpful. In total we used 3 video tracks (this was useful for diagonal editing and effects such as ghosting and dissolves) and 4 audio tracks (this enable us to layer diegetic and non-diegetic sound.
Editing between tracks was also a technique we were able to take advantage of. This allowed us to organise footage efficiently and methodically, and practice or experiment with clips we wanted to use.
More techniques we used involved:
• Capturing
• Non-linear editing
• Using the razor tool (cutting clips)
• Adjusting colour/contrast
• Rendering
• Brightness alteration
• Linking/Unlinking clips – When using Foley, the sound had to be unlinked from the images.
• Transitions – Fades and dissolves at the end and after the main title.
• Changing audio settings (treble)
• Layering shots
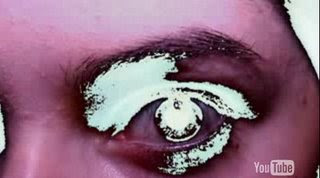
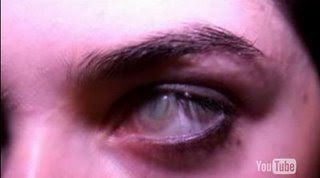
• Ghosting – Opening shots of Mia’s eyes.
• Solarizing – Flashing effects at the beginning
We did face some issues when it came to technology, particularly with sound and lighting. Though it seemed like we were shooting in a perfectly well-lit house, on screen the footage looked dull and flat. We managed to overcome this problem by altering the contrast and colours on some of our clips, but re-shot others using the Studio Lighting kit. Getting lighting to match was a difficult job, but could be done using the settings of Premier Pro. The other problems that we experienced were with sound. On all of our dialogue shots, the camera seems to generate its own sound. Luckily, we were able to experiment with audio settings using premiere software and improve the sound to some extent. We did this by lowering the ‘Treble’ on all the shots in which the whirring sound was most audible. However a low sound is still audible on many shots.
Our camera did not give us any problems. It was user friendly and top-loading, which meant we could change the tape without having to disassemble the tripod each time. We learnt to perfect shots which we had practiced in class or during the Preliminary shoot. These included pans, zooms and cranes. We also learnt the best time to use each of these shots and when to avoid them. For example, we decided the idea of opening with a pan was not going to be effective for a fast-paced opening like ours.
The microphone was such that it sat on top of the camera and did not need any cables. This made it easy to assemble and reduced health and safety risks when moving around.
Effects shown are Ghosting (left) and solarizing (right)


No comments:
Post a Comment